
Atlas F1 GP Illustrator
Painting is not only about talent, and the creation process is far more complex that it may appear. There are endless rules, and several do's and don't's that escape the eye of the casual viewer. Atlas F1's GP illustrator Bruce Thomson brings you closer to the experience of creating a piece of art
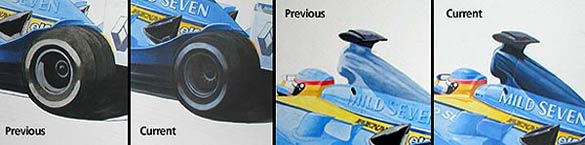
The first thing I did this past week was try to get the tyres knocked into shape. I was finding that, because I had cut the black colour which I created for the tyres with bronze yellow, that the tyres were taking on a little too much of an earthy tone, so the first thing I did was to neutralize this effect by overpainting transparent washes of twilight until the tyres began to take on more of a blue-grey colour. It took me about four washes to get the colour I wanted.
Next up, I needed to blend the black shadow of the tyres into the upper lighter areas and rid myself of the hard outline that I'd inscribed in the original drawing to denote the area where the tonal shift was to begin. I achieved this by starting with fairly thick washes of black to blur the hard line and then progressively lightning the wash as it moved up the back of the tyre. This was a fairly time consuming process which could have been done much more quickly with an airbrush, but I didn't want the exceedingly smooth blend that an airbrush would give me. Obviously, I want the painting to be smooth and slick, but I'd also like it to have some brushwork in it to help it retain a certain humanity that airbrush tends to kill.
Following this, I smoothed out the areas in the wheels themselves by minimizing the contrast with a mix of black and twilight put on again in transparent washes. By this time the wheels had begun to look exceeding dark. Up to this point, everything I'd done to the wheels was "additive" - that is, adding colour. Now I began to work "subtractively", by going in with washes of white to pick out highlit areas of the wheels themselves and softer highlights on the tyres.
Perhaps the trickiest part of this was the application of the white where the "Michelin" logos would be on the tyres. We want to infer speed, so the logo will of course be simply a blur, however, a good blur is tough to do with brush. Again, this would be easier with airbrush, but for the same reason as before, I have decided to do it by hand. Being careful not to throw too much white on at once, I started to apply washes to the wheels. White is by nature opaque, so even a very thin transparent wash has the tendency to knock out what's behind it, so it is very important to put the paint on smoothly. This is easier said than done, but in my favour, a blur is generally not a completely perfect blend, so I'm not too worried about small inconsistencies.
With the wheels pretty much done, I began work on the exhaust and the dark blue upper body. I've taken some artistic licence with the exhaust; generally they are fairly flat looking, but I wanted something that would jump out a little more, so I've given it a glossy appearance. The glossy appearance is achieved by putting hard white lines in and then gently blending them back to darks. Anything that is highly reflective (chrome, gloss plastic etc.) will tend to have these harsh divisions in them. Think of an old car with lots of chrome on it - the chrome would reflect whatever was around it, but it would also compress the colour a little and sharpen up the horizon, depending on the chrome's shape.
The dark upper body, too, is also reflective, so I've invented some artificial horizons to give the appearance of a glossy surface, but also to lend a sense of realism to the painting. Generally, if you look carefully at a car on a sunny day, you will be able to see reflections of what is around it in the paintwork. Next time you pass a clean car (it's easier to see in darker cars) on a sunny day, glance at the bodywork and you'll see your own car or bike reflected there. I haven't attempted to reflect anything specific - this is a generic reflection which I've developed to flatter the body shape and the light source.
This should give you an idea of the developments I've made to these specific areas of the painting to this point:
This has actually been quite time consuming. Again, if I'd done it with airbrush, it would have been quicker, but I think it would have compromised the integrity of the painting.
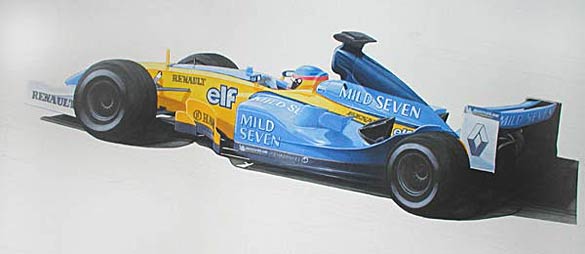
I've finished up this week by tightening up the rest of the body. The work detailed above represents the lion's share of the work, but there were lots of small ancillary bits to fill out including the helmet, the mirrors, the top of the nose, the "Mild Seven" logos, which I've picked out in white again so as not to lose them, as well as darkening up there drop shadow and surround. I've added more tone to the front and rear wing end plates and deepened the shadows in the lighter blue body parts.
In order to highlight the shiny nature of the car I've picked out highlights in the sidepod and base of the car. If you look at the final painting below you'll be able to see these. Anywhere there is a change in the surface of the car, there is an opportunity to highlight this change by picking it out with a white highlight or a darkening shadow (or both). This should be especially apparent on the dark base of the sidepod, immediately behind the "Charmilles" logo. Not only do I have one horizontal highlight to infer a change in the direction of the body, but I have a smaller highlight above and below the main highlight to introduce the new surface. Generally, highlights should follow a fairly straight line, with variations determined by perspective.
You can see this here by looking at the highlight on the very base of the body beneath the three highlights I've just mentioned; it's similar and in line with the ones above. You can go a bit crazy with this, as if there are multiple light sources, you can have highlights galore at all sorts of different tangents (think of a show car beneath hundreds of spotlights), but I try to keep the highlights fairly simple, as too many begin to look a little gaudy.
The car itself is pretty much done. There are a couple of odds and sods that will probably take me more time than I've bargained on, but tomorrow I'll be staring on the background.
I've spent 12 hours on the painting this week, for a total of 62 hours.
At the end of the last installment, I'd stated that I might be getting into the background for this week. As it is, I got carried away in detailing the car and decided to leave the background until the end. In this case, the background doesn't have a strong interaction with the image of the car itself, so there really isn't a problem with when I do it. I could have done it first, or as I intend to, leave it until last and there is no real difference. In a painting where there is a stronger connection between the subject and the ground, I will usually paint the background first so that the subject (car, motorcycle, whatever) will "knock out" the background.
|
Contact the Author
Contact the Editor |
Please Contact Us for permission to republish this or any other material from Atlas F1.
|
Volume 10, Issue 16
Atlas F1 Exclusive
Interview with Bob Bell
Interview with Gianmaria Bruni
Articles
Every Other Sunday
The Paint Job: Part V
2004 San Marino GP Preview
2004 San Marino GP Preview
San Marino GP Facts & Stats
Columns
The F1 Trivia Quiz
Rear View Mirror
Bookworm Critique
On the Road
Elsewhere in Racing
The Weekly Grapevine
> Homepage |